When I was in Paris back in May last year (2017), I met up with and went out shooting with local photographer Serge Ramelli. As a Parisien, he’s photographed the Notre Dame Cathedral many times. He made the video below with ideas on how to shoot the same old familiar location, the one you’re bored to tears with, by using new eyes and approaching it in a new and different way.
Let’s see what Serge has to say first, then I’ll give you the details of the challenge.
How to photograph something you have already shot many times
Go shoot with another photographer
If you’re shooting in your hometown you can host another photographer who is visiting from out of town. Or join a photography club and go out with a small group.
The idea here is that when you go shooting with other photographers, you have the opportunity to broaden your vision and see what they are seeing. Sometimes that’s all that’s necessary to give you a fresh pair of eyes to use on the same scenes you’ve shot a million times.

How to see differently
So what does it mean to see things with new eyes, how do you do that if you’re on your own? Here are some tips to get you started, then you just have to explore and experiment.
First, take the obvious shot. Find a good vantage point and get the standard, your go-to, the “normal” shot.

For me, never having been to Paris, I was seeing it all for the first time. I didn’t have any “usual angles” or know where to shoot from, so I followed Serge and experimented with some of my own ideas.
Try framing
He had shot from under another bridge in the daytime and suggested we give it a go. This is what I got from there. Unfortunately, the lights on inside the tunnel were really bright. I’ve toned them down in Lightroom but I’m not really happy with the shot. I like Serge’s angle (watch the video) better.
The idea here is to find something you can use to frame the subject. Back or get a bit farther away, then turn around and shoot through a doorway, archway, window, or under a bridge like we did.

Look for unusual angles
Change up your camera angle. Get down low, or take a high vantage point and look down. I actually found the puddle and did a few shots with my Fuji earlier on before the city lights came on. Standing water is great for reflections too, notice how even a small puddle can work.

But I couldn’t get down low enough with the tripod and camera so I did the shot below with my phone.


Try long exposures
Especially if you are shooting at night, try different exposure lengths. Capture some car trails, or in this case boat trails, for an added element of interest, something different.

Shoot at a different time of day
Speaking of shooting at night and long exposures, the next thing you can do is shoot at different times of the day. If you’re usually out at midday, try sunrise or sunset. Blue hour is one the best times to shoot in the city as well, but wait until the right moment. Too early and the lights will not be on, too late and the sky will be too dark or black.


Try different processing techniques
Even after you get home with your shots you can use some different techniques for processing them. Do some black and white conversions, try some presets, or even a whole new program or plugin.
If you’ve been reading my articles for a while, you’ll know I’m quite fond of Luminar these days. I tried it just to review it for you – and now I use it on about every second image I process. Here is what I did with my image of the bike that Serge mentioned and replicated.


Your turn
Now it’s your turn. I’m sure there is a location nearby that you’ve shot a thousand times (or at least it feels like it). Before you get out and go shoot it again put some thought into how you can do it differently. Let’s recap some of the options:
- Go shoot with another photographer or small group.
- Try framing in your composition.
- Look for unusual angles, get down low or take high vantage point.
- Try a long exposure.
- Shoot at a different time of day than normal.
- Experiment with a new post-processing idea, technique or style.
What other ways can you see the same old spot with new eyes? What if you rented a super-wide lens? Shoot it only with your smartphone? What other ideas can you come up with?
Details of this month’s Photography Challenge
This one is pretty simple, you could do it in an afternoon.
Here are the rules to be eligible for the prize:
- Choose a location that you’ve photographed before, more than once if possible.
- Go shoot it again in a different way.
- Post a comment below and tell us about what you learned by doing this challenge. Did you see the location in a new light? Were you able to capture images that were different? Please note: If you just share your images you will not be entered to win the prize. Please make sure to tell us about your experience as well.
- Share at least one of your images, taken of your location with your new eyes. Upload it right into the comments section below, along with your answer from #3 above.
Deadline for entry to be eligible to win the prize is: March 14th, 2018 10 pm MST (-6 UTC)
The Prize:
This month’s winner (selected randomly from all eligible entries) will receive their choice of either a $50 gift certificate from Amazon OR a copy of my 4 Weeks to Better Photography online class (retail value $49).
Winner of the last challenge – tell a story
From our last challenge which was to tell a story with one image, we had many great submissions and entries. I think you are ALL winners because you did such a fantastic job of storytelling with your images. Pat yourselves on the back!
From the entries, I used a random name picker to select the winner and it is . . .

Congratulations Kim, I’ll be emailing you so you can claim your prize!
Not only did Kim take the photo but she wrote the words as well. I’ve only ever been compelled to do that once myself – the words just sort of flowed out like they were coming from somewhere other than my own mind and out my hand to the paper. When that happens – just go with it! Well done Kim.
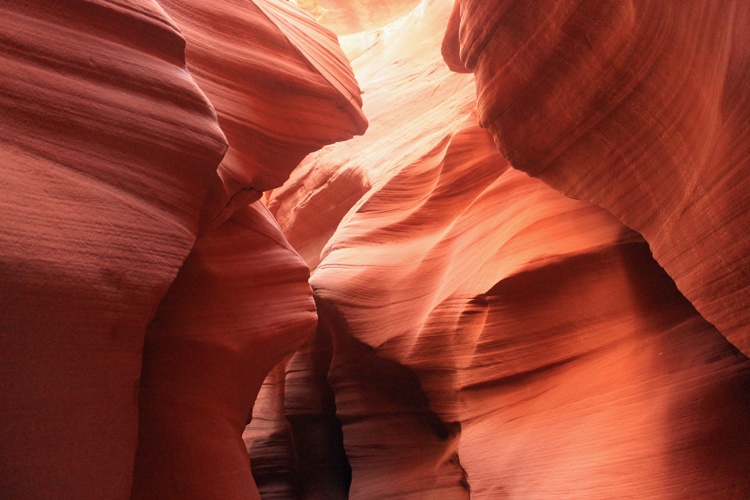
Horseshoe Bend Slot Canyons
by Kim Jackson
Traveling by jeep on a very bumpy road through private Navajo land,
I came to experience the slot canyons.I’d seen photographs during my research,
but I could not imagine what it would feel like to experience it myself.As soon as I walked to the entrance of the slot canyon,
I couldn’t move.I was awe-struck by the beauty that surrounded me,
and I couldn’t explain what I was feeling.These slot canyons had been formed millions of years ago from the wear of water rushing through the rock,
forming ripples and layers in the delicate sandstone.I felt the sudden urge to run my hands across the surface of the sandstone,
but I was afraid that I would somehow ruin it.While exploring the canyon with my camera, our Navajo guide began playing her double flute,
the sound was beautiful, yet haunting, and I was frozen.I wanted to stay longer and not leave this sacred place,
but one day I will return to enjoy it again.
Cheers,

