If you’ve ever made a sky darker in Luminar Neo and ended up with a glowing ring around your trees, you’ve met the halo problem. It’s one of the most frustrating things in photo editing, and it makes an otherwise good edit obvious to anyone who looks. Luminar Neo’s new Feather and Shift Edge sliders are designed to fix exactly this. In this walkthrough, you’ll see how to use both sliders across seven different real-world masking scenarios.
TL/DR: Luminar Neo’s Feather and Shift Edge sliders, found in the Mask Actions panel, let you soften and resize any mask after you’ve painted or selected it. These two sliders solve the most common masking problem: halos around subjects. Use Feather to blur the mask edge, and Shift Edge to push the mask boundary in or out. Works on every mask type: brush, Mask AI, Object Select, Luminosity, and Color.
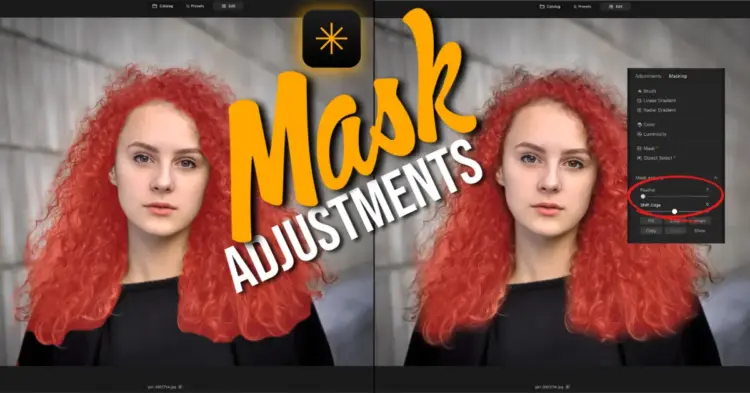
What Are the Feather and Shift Edge Sliders in Luminar Neo?
The Feather and Shift Edge sliders live in the Mask Actions section at the bottom of any tool that supports masking. Feather softens the boundary of your mask after you’ve applied it. Shift Edge moves the mask boundary inward or outward. Together, they give you post-selection control over any mask, without having to start over.
This is the key most beginners miss. You do not have to paint a perfect mask on the first try. Select roughly, then refine with the sliders.
How Do I Get Rid of Halos Around Trees in Luminar Neo?
Halos appear most often where you have something dark against something light with a well-defined edge: trees against a blue sky, a person against a bright background, a car against a clean surface. Luminar’s Mask AI finds the general shape but leaves a fringe of the background color inside the mask boundary.
To fix it:
- Apply your adjustment and create your mask using Mask AI, Object Select, or a brush.
- Open the Mask Actions panel at the bottom of the tool panel.
- Drag the Feather slider to the right to soften the mask edge.
- If the halo is still visible, drag Shift Edge to the left to pull the mask boundary inward, away from the background.
- Combine both sliders until the edit blends without any visible fringe.
The goal is an edit that nobody knows is there.
Can I Use These Sliders with Luminosity and Color Masks?
Yes. The Feather and Shift Edge sliders work on every mask type in Luminar Neo, including Luminosity and Color masks. This is significant because those two mask types have historically been harder to refine. Once you dial in your luminosity range or color selection, you used to have to go back and start over if the edge was rough. Now you set the mask, come down to the sliders, and refine from there without touching the original selection.
What Is the Shift Edge Slider and How Does It Work?
Shift Edge moves the boundary of your mask without affecting the softness of the edge. Dragging left shrinks the mask; dragging right expands it. The key detail: the direction the mask moves depends on which element you masked. If you masked the sky, shifting left makes the sky selection smaller. If you masked a subject, shifting left pulls the mask away from the subject’s edges.
Pay attention to what you’ve selected before you drag.
Do I Need a Perfect Mask for Every Edit?
No. A mask only needs to be accurate enough for the edit to be invisible. In the duck sharpening example, the mask extends slightly outside the bird’s wings. Because the sharpening effect is subtle and the background isn’t being sharpened aggressively, the slight overspill is not visible in the final image. Spend your refinement time on edges where the effect is strong or the contrast between subject and background is obvious.
How-To Steps: Removing a Halo with Feather and Shift Edge
-
Apply Your Adjustment and Create a Mask
Select any adjustment tool in Luminar Neo, apply your edit, then open the Masking section. Choose your mask type: Mask AI, Object Select, Brush, Luminosity, or Color. Apply the initial selection.
-
Open the Mask Actions Panel
Scroll to the bottom of the masking tool panel. Click the downward-pointing triangle to expand the Mask Actions section. This panel appears on every tool that supports masking in Luminar Neo.
-
Enable the Mask Overlay
Turn on the mask overlay to see exactly where your mask is applied. This makes it easier to judge the edge quality before you adjust the sliders.
-
Drag the Feather Slider to Soften the Edge
Drag the Feather slider to the right. Watch the mask boundary become softer. Feathering blends the transition between the masked and unmasked areas, eliminating sharp edges and halos.
-
Adjust Shift Edge to Reposition the Mask Boundary
Drag Shift Edge left to shrink the mask or right to expand it. Use this to pull the mask away from problem edges or push it further into the target area. Combine with Feather for the smoothest result.
-
Toggle the Mask Overlay Off and Evaluate
Turn off the mask overlay and zoom in to the edge of your subject. Check for any remaining halo or fringe. If the edit is invisible, the mask is refined. If not, return to steps 4 and 5.
Quick Reference: Which Slider Does What
| Slider | Direction | Effect |
|---|---|---|
| Feather | Right | Softens the mask edge |
| Feather | Left | Sharpens the mask edge |
| Shift Edge | Right | Expands the mask boundary |
| Shift Edge | Left | Shrinks the mask boundary |
Where to Learn Luminar Neo Masking in Depth
These sliders are one part of a complete masking workflow. In the Luminar Neo: The Complete Course, masking is covered step-by-step with real images across all mask types. You’ll learn when to use each mask, how to combine them, and how to get clean results on complex subjects like hair, foliage, and transparent edges. If Lightroom Classic is your primary editor, the Lightroom for Photographers: The Complete Course covers its own masking system in the same structured format.
Darlene Hildebrandt, Master of Photographic Arts (MPA) and Skylum Ambassador, teaches both courses. Both are self-paced and built for beginner and intermediate photographers who want to stop guessing and start editing with confidence.
